

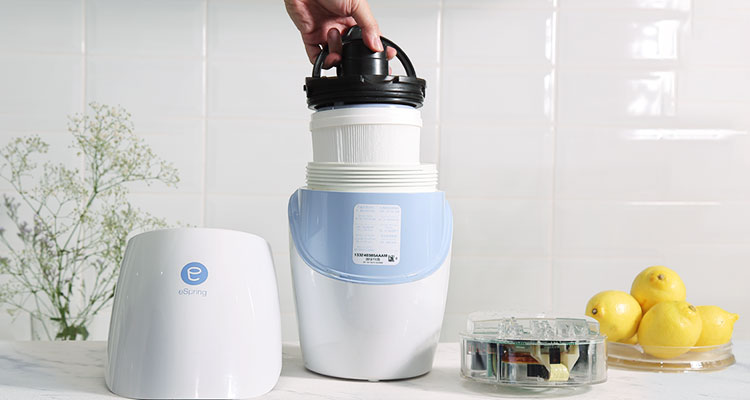
How To Replace Water Filter Cartridge
Beeeeep! Beeeeep! Beeeeep!
That could be the sound of your eSpring Water Handling Organisation telling yous that it's time to replace the eSpring cartridge.
Information technology's advisable to supervene upon the eSpring cartridge every year or once every v,000 litres of h2o, whichever comes first, to maintain your h2o quality. If your h2o contains higher amounts of contaminants, you might exist required to replace your eSpring cartridge more frequently.
What'south great is that y'all don't accept to keep rail of the months or count how many litres of water y'all're drinking each 24-hour interval to know when to replace the eSpring cartridge. Each eSpring monitor features an indicator that shows the remaining cartridge life and automatically informs when to replace the cartridge with an early as well as a secondary notification.
6 Easy Steps To Alter Your eSpring Water Filter Cartridge
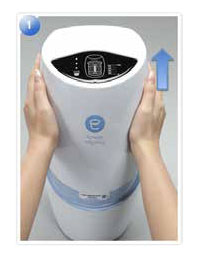 | Step 1: Remove the superlative cover. Remember to unplug the ability adapter earlier that. |
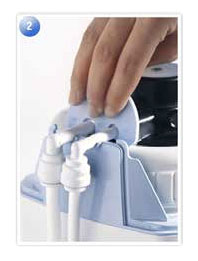 | Footstep 2: Remove the electronic module and so pull the elbows out. |
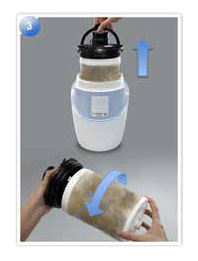 | Step 3: Unscrew to remove the collar. Lift the handle on the subclass. Unscrew to remove the attached used cartridge and replace it with a new 1. Empty the water from the base. |
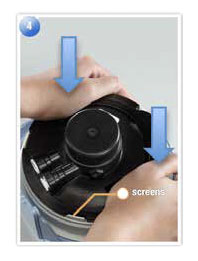 | Footstep four: Firmly press the new cartridge until information technology comes into contact with the base. Align the notches of the bracket with the tabs on the base. |
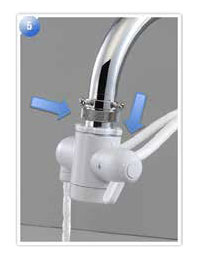 | Pace 5: Screw on the neckband, reinsert the tubes and check for leakage. Screw on the neckband until it 'clicks' to a stop. |
 | Step six: Re-install the top cover & the electronic module. Plug in the power adapter. Turn on water to the eSpring Water Treatment Organization. The display shows that the replacement is complete. From the brandish, all usage segments of the cartridge should be visible. |
Look.... What's This Red Phone, Scarlet Cup Beeping?
Occasionally, after changing the eSpring cartridge, you might see the Carmine Phone and Red Loving cup beeping on your eSpring monitor. This can sometimes happen if the filter bracket is dirty.
Then, there'south no demand to worry, just follow the steps below to clean your filter bracket.
How to make clean your filter bracket:
Step 1: Unplug the eSpring from the wall outlet. Remove the top cover and electronics module.
Step 2: Mark the tubing with a pen to indicate how far they are inserted into the bracket and so release tubing from the eSpring filter bracket.
Step 3: Unscrew the retaining band and lift the filter bracket using the handle and examine the filter to see if it is very dirty or slimy. Rinse the filter with running water (no soap). Alternately, now could be a good time to replace your eSpring cartridge.
- If you're seeing the error after replacing your cartridge, just remove the new cartridge and set it bated without rinsing.
Pace 4: Using a gentle bristle brush (toothbrush) and soap, scrub the inside of the filter bracket.
Step 5: With soap and water, clean out the basin of the eSpring unit.
Step 6: Hold the filter bracket in one hand, with the other paw, insert the filter cartridge and turn clockwise until it reaches a positive stop.
Step 7: Set the filter bracket into the base of operations housing, making certain the base housing tabs are in line with the filter bracket notches/slots.
Step 8: Button down firmly to ostend that filter and bracket are seated properly. Using both easily, push downward on the sides of the filter subclass until information technology is positioned downward as far equally it will go into the base housing.
- A used, moisture filter will take more force than a new, dry cartridge and water/air may come up out of the outlet port.
Footstep 9: Place the retaining ring over the filter subclass and onto the base housing. While holding down the filter bracket (tiptop centre) with your palm, employ the free hand to tighten the retaining ring until it reaches a positive finish.
- Practise non go by the stop. If the filter bracket pops up before the retaining ring has reached the positive terminate, then push down harder on the tiptop of the filter bracket until it makes contact with the base housing.
Step 10: Re-insert the tubing into the filter bracket quick connect ports and brand certain the tubing is fully inserted.
Step 11: Printing the electronics module firmly onto the filter bracket.
Step 12: Reinstall the top comprehend, making sure the cord is correctly in place.
Footstep 13: Correctly reseat the summit cover.
Step 14: Turn the eSpring faucet ON to release common cold h2o into the eSpring unit of measurement.
Notation: If the water supply/source shut off valve was previously turned off, leave the eSpring faucet in the ON position (diverter pin pulled out) before opening the water supply/source shut off valve.
Step 15: Turn the water back on and flush the air out of the system before use.
Detect more than guides to maintaining and cleaning your eSpring water filter unit here.

How To Replace Water Filter Cartridge,
Source: https://amwaynow.my/en/articles/how-to-change-your-espring-water-filter-cartridge-amwaynow
Posted by: johnsonsniters.blogspot.com
0 Response to "How To Replace Water Filter Cartridge"
Post a Comment